
How to go about shooting long exposure photographs
In general, in photography, a shutter speed slower than a second is termed a “long exposure”, although the exact demarcation point varies from photographer to photographer. Personally, I class anything that's slower than hand-holding speed a long exposure.
But why would you want to make a photograph with such a long exposure? Well the possibilities are many-fold.
The ability to turn uninteresting relatively bland skies into long smooth banks of cloud or a lonely little waterfall into silky smooth watery arcs gives the photographer a great deal of artistic license. Long exposures can also be used to "remove" people in moderately busy urban scenes too. On a long exposure a person walking through a scene, assuming they're not crawling or have a light strapped to their head will simply not appear in a long exposure.
Adding lights into the image offers up a whole load more options; light painting, car light trails, starry skies or even capturing the aurora borealis.
So just how do you go about achieving all this?

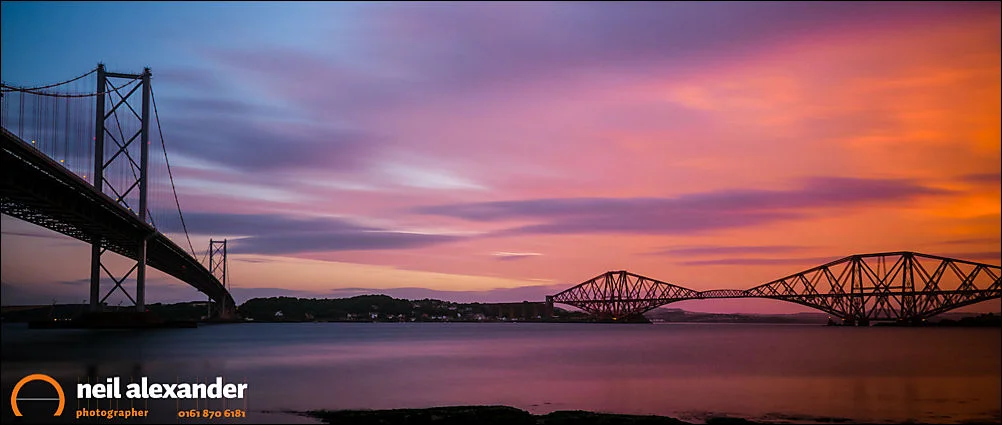
Rhosneigr beach at dawn
1. Use a tripod - The first and by far most important point is a stable platform for your camera. Whether it's sitting on a bean bag on a wall, a little gorillapod or a full blown tripod, the key is to making sure that the camera doesn't move even the slightest millimetre during the exposure.
2. Lowest ISO - One of the problems with all digital cameras is that the longer the shutter is open and the darker the scene, the more "noise" the sensor will generate. The simplest solution is to set your camera to its lowest possible native ISO setting. Be warned that some cameras, many Nikons for example, have their lowest native ISO as 200. Forcing them lower than this can generate more noise than one would expect
3. Long exposure noise reduction - Most DSLRs have a feature that you can enable called "long exposure noise reduction" and many photographers swear by using this when shooting slow shutter speeds. I don't for two simple reasons; the first is that the in-camera noise reduction process generally takes the same amount of time as your original shutter speed again. Therefore a 5 minute exposure requires you to wait 10 minutes to see whether your shot worked or not and I'm an impatient kind of guy. And the second is that the noise reduction algorithims in the latest versions of most image processing software, like Adobe Lightroom 6, is now so good that it can often do a better job than the camera can. So why wait?
4. Compose and focus - So once you've decided what to photograph, the next step is to compose and lock in your focus. I'll set my focus using the camera's autofocus and then set it to manual so that it doesn't change again.

5. Add graduated filters - If you want to use graduated filters to darken down the sky a little then now is the time to add them and get them in the right spot.
6. Make a test exposure - Now make a trial photograph and check your histogram. Adjust your settings if necessary. Also look at your white balance settings. Very long exposures can tend towards blue in colour and feel very cold. Either set a manual white balance now, or be prepared to adjust this in your processing.

7. Add ND filters - If you plan on using an ND filter (which is essentially just a piece of slightly opaque glass or plastic) to give you an even longer exposure then now is the time to pop it on. With my 10 stop B&W ND filter, it is impossible for me to see anything through the viewfinder once the filter is on so its always best to compose and focus first. Once it’s on, I manually adjust the exposure depending on the strength of the filter I am using. There’s plenty of apps to help you with the maths but the wee chart below doesn’t require a great deal of knowledge of rocket science to work out. Rather than using ND filters, it is possible to adjust your camera to it’s narrowest possible aperture to give you a slower shutter speed but this I find problematic; if my composition demands a wider DOF, then I simply can’t use a really narrow aperture. Also, from experience, I can assure you that every last little spec of dust that your gear has inhaled will show up as really pronounced dust spots all over your image. I’ve had many completely unusable photographs doing this and learnt the hard way.
|
F-stop Reduction (EV) |
Optical Density (EV) |
ND Factor |
|
1 |
0.3 |
2 |
|
2 |
0.6 |
4 |
|
3 |
0.9 |
8 |
|
4 |
1.2 |
16 |
|
5 |
1.5 |
32 |
|
6 |
1.8 |
64 |
|
7 |
2.1 |
128 |
|
8 |
2.4 |
256 |
|
9 |
2.7 |
512 |
|
10 |
3 |
1024 |
8. Shutter triggering - Next you need to know how you are going to trigger your shutter. Obviously actually pressing the button is going to induce movement in your camera. Even if you’ve the most delicate touch, this is definitely a sure fire way to blurry images at long shutter speeds. Your options are to either use the camera’s self-timer - most go as low as a second or two’s delay, or use a cable release. Cable releases can either be wired or wireless and go from less than £10 to over £100.
9. Cover viewfinder - A common problem in long exposure photography is light entering through the viewfinder. This can cause all manner of issues from inaccurate exposure readings to purple or magenta streaks in your image. That little piece of plastic that was over the viewfinder window when you bought your camera does actually serve a purpose. If you chucked it out along with all the packing, then you need to swing by eBay and get yourself another one or improvise with a spot of duct tape.
10. Protect filter set from light glare - If you are shooting into the sun and have a filter or two on then you are almost guaranteed to get sun flares on your image. Whilst they may look pretty initially, you really don't want them in your image. If it's not possible to shield the front element from the sun, then you may have to make several different images with and without an attempt to protect from flares and merge them in Photoshop later
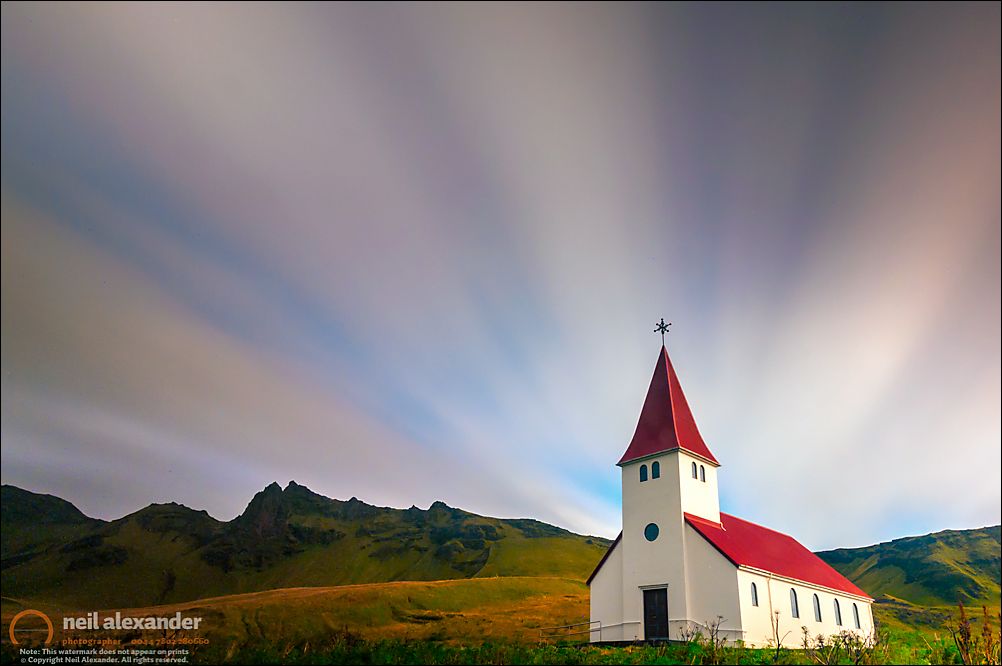
A 5 minute exposure of first light over the church at Vik in Iceland
Now with all that knowledge, go shoot some long exposures and please share them in the comments section below. I’d love to see what you come up with.